Make Outlook Calendar Private
Make Outlook Calendar Private - O hide your calendar details from others using the scheduling assistant, follow these steps: To do that, open outlook’s calendar view. Outlook provides two methods to make your calendar private: Set the permission level for read to none. In the tags group, select private. Under publish a calendar, choose the calendar you want to publish and how much detail users can see.
We’ll cover both options below. Click the private button on the appointment tab. Open outlook and go to the file tab. To make it public, you need to modify the sharing settings to allow everyone access. Set the permission level for read to none.
How To Make Your Calendar Private On Outlook Flori Jillane

Under publish a calendar, choose the calendar you want to publish and how much detail users can see. Using the calendar settings or delegate access. Click the private button on the appointment tab. To make it public, you need to modify the sharing settings to allow everyone access. To do that, open outlook’s calendar view.
How To Make Appointment Private In Outlook Shared Calendar Adena Arabela
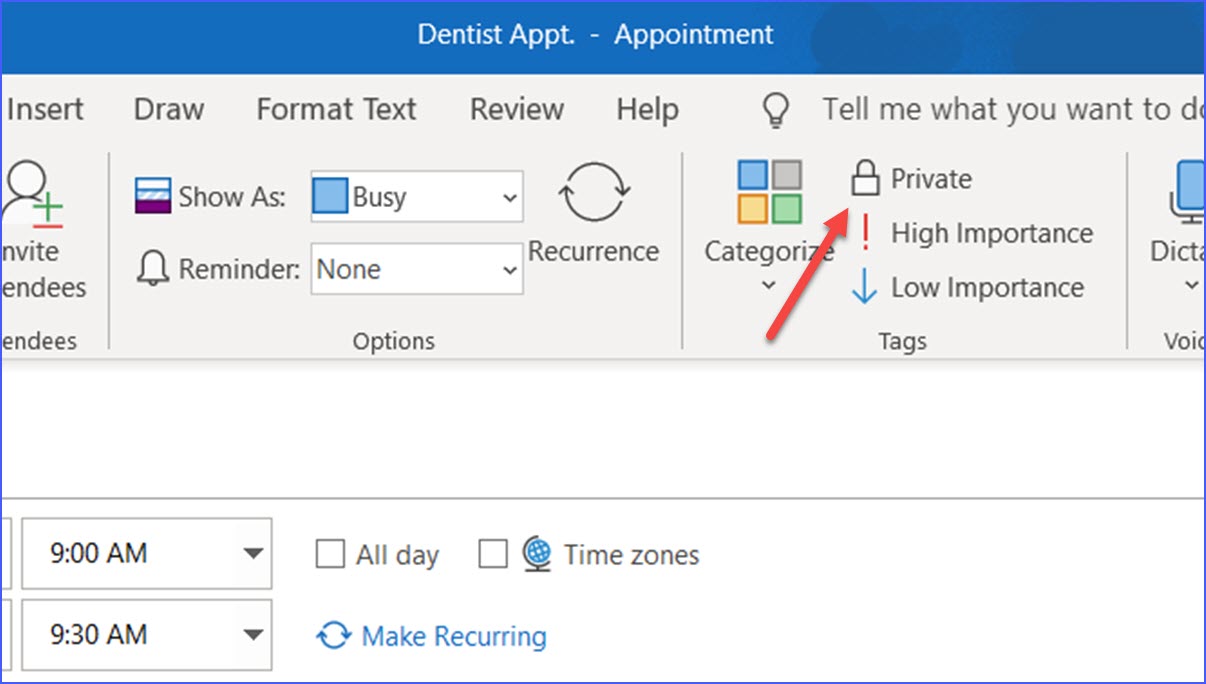
In the calendar of classic outlook, select the meeting or appointment you want to make private. Outlook provides two methods to make your calendar private: On the home tab, click sharing permissions. To make it public, you need to modify the sharing settings to allow everyone access. At the bottom of the navigation pane, click calendar.
How to Make Calendar Private in Outlook?

On the home tab, click sharing permissions. Set the permission level for read to none. Under the calendar options tab, scroll down to the calendar sharing section. Uncheck the box next to allow others to see my schedule to disable calendar sharing. With the private option, you can hide calendar appointments, events, and task details from other users.
How to Make Outlook Calendar Private Hide Calendar Details

Click the permissions tab and in the list of names select default. Select the meeting appointment on the calendar. Can i cancel the publication of a calendar? Open outlook and go to the file tab. We’ll cover both options below.
How to Make Your Calendar Private in Outlook A StepbyStep Guide

Open your calendar and create a new event. Click the private button on the appointment tab. By default, your outlook calendar is private. Uncheck the box next to allow others to see my schedule to disable calendar sharing. Outlook on the web not available.
Make Outlook Calendar Private - O hide your calendar details from others using the scheduling assistant, follow these steps: We’ll cover both options below. At the bottom of the navigation pane, click calendar. Uncheck the box next to allow others to see my schedule to disable calendar sharing. Select the meeting appointment on the calendar. In the tags group, select private.
Select the meeting appointment on the calendar. In the tags group, select private. To make your calendar private in outlook, follow these steps: Can i cancel the publication of a calendar? Outlook on the web not available.
On The Home Tab, Click Sharing Permissions.
In the tags group, select private. To make your calendar private in outlook, follow these steps: We’ll cover both options below. In the event, look for the option that says show as or privacy. change it to private..
By Default, Your Outlook Calendar Is Private.
Select the calendar you want to hide. To make all appointments private by default in outlook 365 agenda, you can follow these steps and set your email sensitivity private, this will allow all new calendar appointments and emails set to private by default. To do that, open outlook’s calendar view. Open outlook and go to the file tab.
Under Publish A Calendar, Choose The Calendar You Want To Publish And How Much Detail Users Can See.
Outlook provides two methods to make your calendar private: Uncheck the box next to allow others to see my schedule to disable calendar sharing. Click the permissions tab and in the list of names select default. Can i cancel the publication of a calendar?
In Calendar View, A Lock Symbol Will Appear On The Event To Indicate It Is Private.
Using the calendar settings or delegate access. In the calendar of classic outlook, select the meeting or appointment you want to make private. To make it public, you need to modify the sharing settings to allow everyone access. Open your calendar and create a new event.